The following free beginner bass lesson is an excerpt of some exercises taken from my own library of music lesson content. I recommend students take a look at the Theory Primer Lesson on my blog to learn about the Musical Alphabet and the basics of notation. I’ll be adding more content to the free blogs over time. Many of the examples will be in video format showing you the notation and tablature as it’s being played on the screen. This will help you to understand how to count rhythm as you can follow along in real time. I sincerely hope this helps you to get a head start learning a few basics on your own.
Reading Tablature
This first section will be a brief introduction on how to read tablature for the 4-string bass guitar. Let’s get started!
These four horizontal lines represent the four strings on the bass guitar. The bottom line represents the 4th string E which is the largest diameter and lowest sounding string. Above that is the 3rd string A and above that the second string D and above that the 1st string G.


This next example shows what the matching note would be written in standard music notation on the bass clef. Under each note you will see the suggested left-hand fingering. In the right-hand, just play the string with the tip of your index finger for now.

In this next example the fingering does not necessarily match the fret number. This is because the musical performance of playing notes relies on various fingering choices. Some fingerings are better suited than simply matching fret numbers with finger numbers. Using the weaker 3rd finger to play the note in the 3rd fret here is not the best fingering choice given where the bass line is going. The second finger in this case is the better choice.

Music Notation Basics – Bass Clef
Lets begin with identifying the natural notes on the bass clef staff. The tablature is just a temporary measure to help you locate the notes on the proper string in the proper fret. We will begin exploring these notes in the lowest region of the bass. This is referred to as the “open position”. This means were playing a combination of fretted notes and open strings too. If we we’re playing a little further up on the neck and using no open strings, it would mean we are using a “closed position” fingering. That will come a bit later!

Try playing the following exercise slowly and smoothly all the way up and back down until you can play it with a slow steady beat. You need to memorize these notes so that you can play them without using the tablature. Try reciting them aloud as you play going up and down.
The Natural Notes Ascending

The Natural Notes Descending

Technique Development
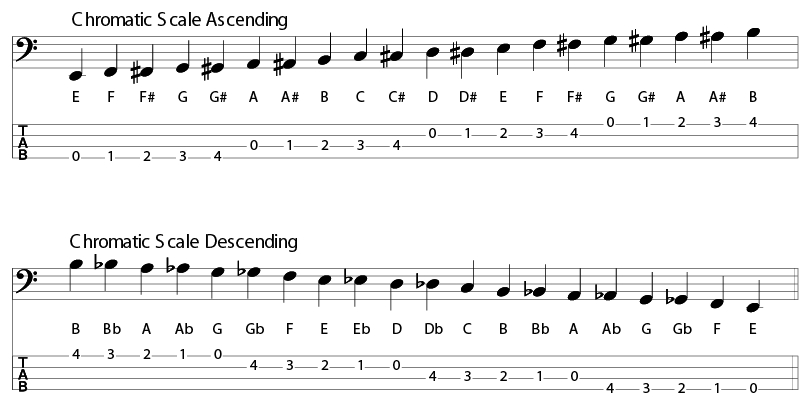
The Chromatic Scale is a great scale for developing the dexterity and hand position on the neck. Play this very slowly and keep your thumb vertical on the back of the neck. Play it as smooth as possible trying to ‘connect’ the sound of the notes one to the next. For the Right-hand, try alternating the index and middle finger as you play. Start with the index finger on the E note. Memorize the letter spellings of each note so that you can play this and name the notes without looking at the music.

Musical Practice Makes a Musical Player
The following exercises are based on the E minor pentatonic scale. This is an extremely useful scale to start out with. It’s the most prominent scale in rock and blues. Play it up and down several times to get a sense of the sound of the scale and how it resolves to the E note. Memorize this sequence of notes so that you can play it without looking at the music. Practice it slowly until you can play it with a steady beat all the way up and back down.

Adding Rhythmic Structure
*The next few exercises are in video format with audio so that you can hear the timing and play along. Keep in mind that the sound file is in midi format. This keeps the file sizes smaller yet is adequate for demonstration purposes.
Whole Note Rhythm
This note is played once and held for four beats. Four beats is the total number of beats in each bar. This is indicated by the time signature 4/4 at the beginning of the first bar. The top number 4 is the number of beats (or counts) per bar. The bottom 4 tells us that the quarter note is equal to one beat. There will be a 4 click count-in before the bass line starts so tap your foot on each beat. Watch, listen then play!
Half Note Rhythm
This rhythm is two beats per note so using half-notes you can have two in each bar.
Quarter Note Rhythm
This rhythm is one beat per note so using quarter-notes you can have four in each bar.
Eighth Note Rhythm
The fingerings for the right hand are written just above the note. i=index m=middle fingers. Where I’ve left out the fingering just playing the same fingering from the previous measure.
Hopefully this was helpful for you to get a start on playing some basics! Soon I’ll be offering paid courses online as well as more free content in this blog section.
Enjoy and keep rockin’! Dave
